Choosing the BEST Material
Weighing the costs and benefits of different aluminum options in manufacturing
In manufacturing and machining, it’s important to consider the properties of the material being used.
Incorrect selection can result in either purchasing expensive material with properties that aren’t needed, or material that isn’t up to the task.
Choosing the right one can seem daunting- but we’re here to help.
Aluminum Properties
In this article, we focus on the most technically significant aluminum cast and rolled plates, with one exception—round bars made from EN AW 2007 [AlCu4PbMgMn].
Every manufacturer goes through the process of choosing the best material for their project, searching for the elusive “jack-of-all-trades” option. Choosing from the overwhelming selection of materials can mean either using an overqualified material, or a material that’s not up to the task- driving up the final cost. Finding the best alloy for your project can be intimidating, but we’re here to help.
Understanding Materials
Understanding materials and their properties is the first step towards cost-effective production of high-quality products.
The tables below display the properties of our most popular aluminum alloys. Highlighted materials are GLEICH exclusive products.
*For information regarding type, thickness, and lead-time, please contact a GLEICH-USA representative.
Misconceptions: Aluminum Cast Plates
We often hear the phrase:
“A cast plate is out of the question!“
This is because a “true cast plate” is typically associated with porosity, and defects can be millimeters in size. Generally, these plates are made from EN AC alloys.
G.AL® Cast Plates are manufactured using wrought alloys (EN AW). The term “cast plate” originates from the raw material, known as rolling ingots or slabs. These are produced through vertical or horizontal direct chill (DC) casting, and are primarily used to manufacture rolled plates.
Key difference between Rolled Plates and G.AL® Cast Plates
In the production of rolled plates, an ingot (e.g., 24 inches thick) is reduced down to the desired plate thickness (e.g., 0.8 inches). Through the rolling process, the grain structure is elongated in the rolling direction. In contrast, G.AL® Cast Plates are heat-treated and sawn into plates using band saws, preserving the structure of the ingot.
Because G.AL® Cast Plates retain the original cast structure and have no directional grain alignment; they are classified as “cast plates.”
Porosity
Porosity refers to tiny holes (pores) in the material’s surface. Microporosity is when porosity is visible at 1 millionth of a meter. These pores can collect dust, dirt, gasses, and chemicals used in their production process. If used in sterile or chemically sensitive environments, these pores and their impurities can affect product measurements, cause corrosion, set off harmful chemical reactions, and more.
Rolling ingots have micro-porosity, which affect their rolled products. For high-strength aluminum alloys, micro-porosity is typically present in thicknesses of about 0.8 inches, or, for naturally hard alloys, around 2.4 inches.
G.AL® Cast Plates are manufactured according to the GLEICH standard, enforcing tight casting parameters for ingots to virtually eliminate porosity. G.AL® Cast Plates are engineered so that porosity is only detectable at the Nano level (porosity visible at 1 billionth of a meter), DYNAMIC cast plates are manufactured with no microporosity at all.
Strength
Rolled Plates
According to DIN EN 485-1, strength tests for rolled plates up to 1.6 Inches (40 mm) thick must be taken from the center of the plate perpendicular to the rolling direction. This ensures the material is tested at the weakest point and minimizes the risk of failure during use.
For rolled plates thicker than 1.6 inches (40 mm), samples must be taken from a depth equal to 1/4 of the plate thickness (also perpendicular to the rolling direction).
Standards mandate minimum strength values for rolled plates, defined and regulated under DIN EN 485-2.
G.AL® Cast Plates
For G.AL® cast plates, material testing is performed across the entire cross-section of the plate. This approach allows us to accurately assess the material’s load-bearing capabilities.
GLEICH is the only manufacturer of aluminum cast plates in the world that conducts systematic material testing for every production batch. We provide 3.1 inspection certificates that include the actual mechanical properties, making this a unique global offering.
Hardness
Hardness and Strength
For aluminum, hardness has a limited correlation with strength. Hardness in aluminum is more closely related to its physical properties than to its mechanical properties.
Measuring Aluminum Hardness
The Brinell Hardness Test using a tungsten carbide ball (HBW) is the only standardized and valid method for measuring the hardness of aluminum.
Testing using a steel ball (HBS) has been prohibited since the early 1990s.
Other methods, such as Vickers or Rockwell hardness tests, lack validity and are not recognized for aluminum.
Aluminum Hardness
Hardness is not a standardized property for aluminum; this report is purely informational in nature. Manufacturers are not required to test, measure, or document the hardness of aluminum semi-finished products. Any claims or demands related to aluminum hardness are considered invalid.
Exceptions:
If a 3.1 Inspection Certificate (such as the one provided by GLEICH) or a Material Performance Data Sheet includes hardness values without a disclaimer such as “for informational purposes only,” you can assume that the stated values are valid.
*Notes on Rolled Plate Strength
Aluminum cast plates, regardless of the manufacturer, are not subject to binding national or international standards for strength.
There are no mandatory testing methods or prescribed testing scopes.
The manufacturer decides whether to perform strength testing.
The mechanical properties are defined solely by the product brochures or datasheets provided by the respective manufacturer.
The true strength at the plate’s weakest point isn’t always known.
GLEICH Classification
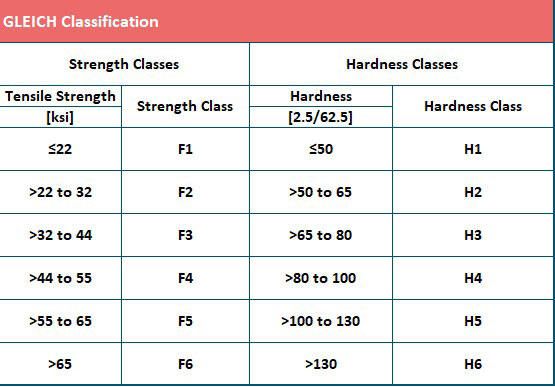
For quick selection, the materials discussed in this article are categorized into six strength and hardness classes. Class 1 represents the lowest strength and hardness; higher classes indicate stronger and harder materials.
Important Note
The classification of tensile strength and hardness was developed based on practical considerations by the author of this article. GLEICH and many other business partners have used this system successfully.
These classifications are not part of any binding national or international standards. They are considered the intellectual property of the author.
Strength Classes
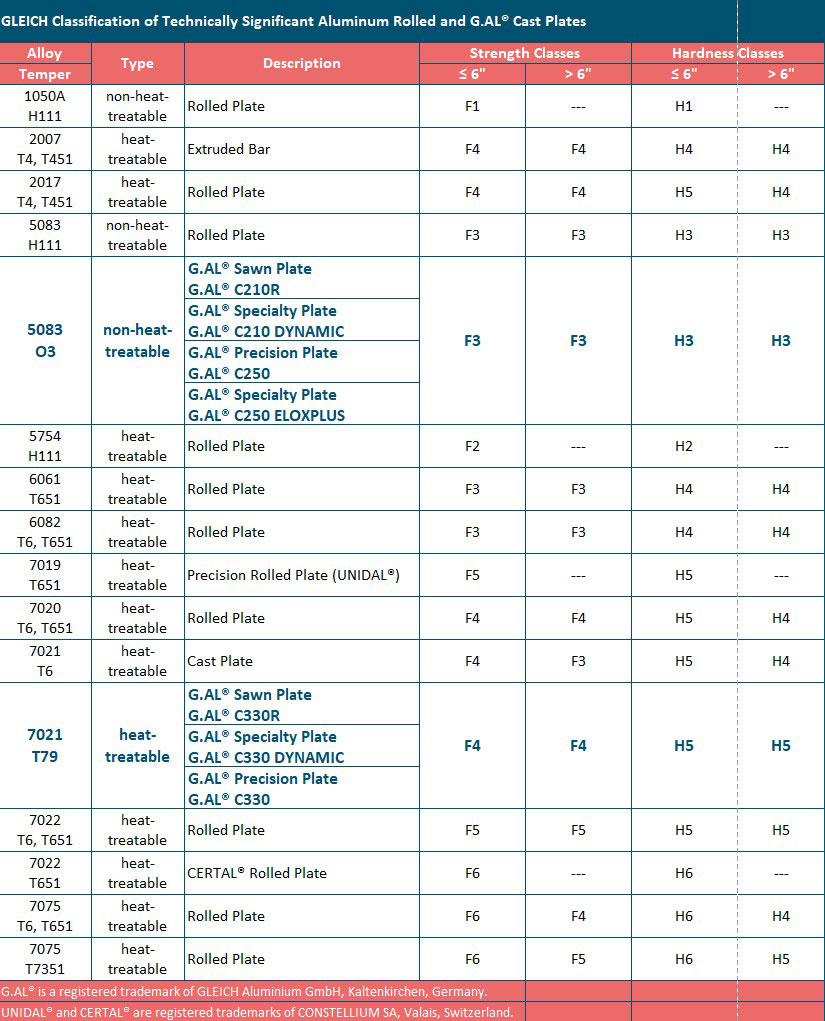
The GLEICH strength classes are outlined in Table 1, with particular attention to thickness gradation for high-strength alloys in the 7000 series (AlZnMgCu group).
In Table 2, the most technically significant alloys are classified by strength (applies only to rolled plates).
Hardness Classes
The hardness of a material is critical for specific applications. Table 1 also includes the GLEICH hardness classes, providing a quick reference for material selection.
In Table 2, the hardness classifications for the most important aluminum rolled plates are provided.
Table 1
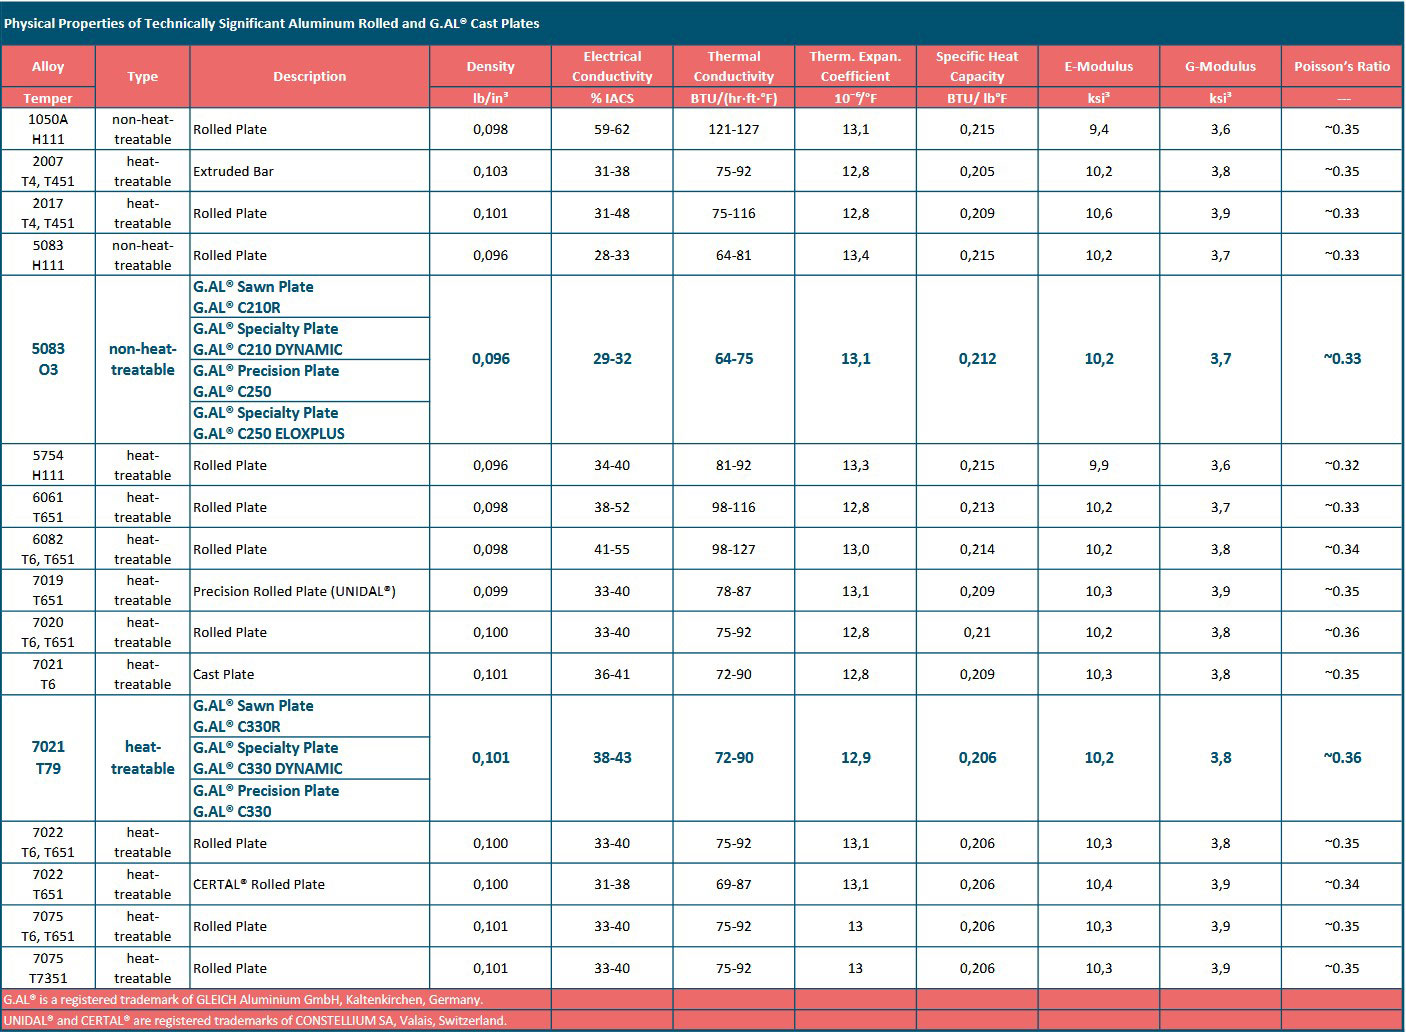
Physical Properties
of Technically Significant Aluminum Rolled and G.AL® Cast Plates
Understanding the physical properties of various aluminum alloys is crucial for a wide range of applications. Table 3 provides key data regarding these properties, including:
- Elastic Modulus (E-Modulus)
- Shear Modulus (G-Modulus), also known as sliding, shear, or torsion modulus
- Poisson’s Ratio
*Since these values can exhibit slight variations, they are typically preceded by the symbol “~” to denote approximate values.
Table 3
Resistance to External Influences
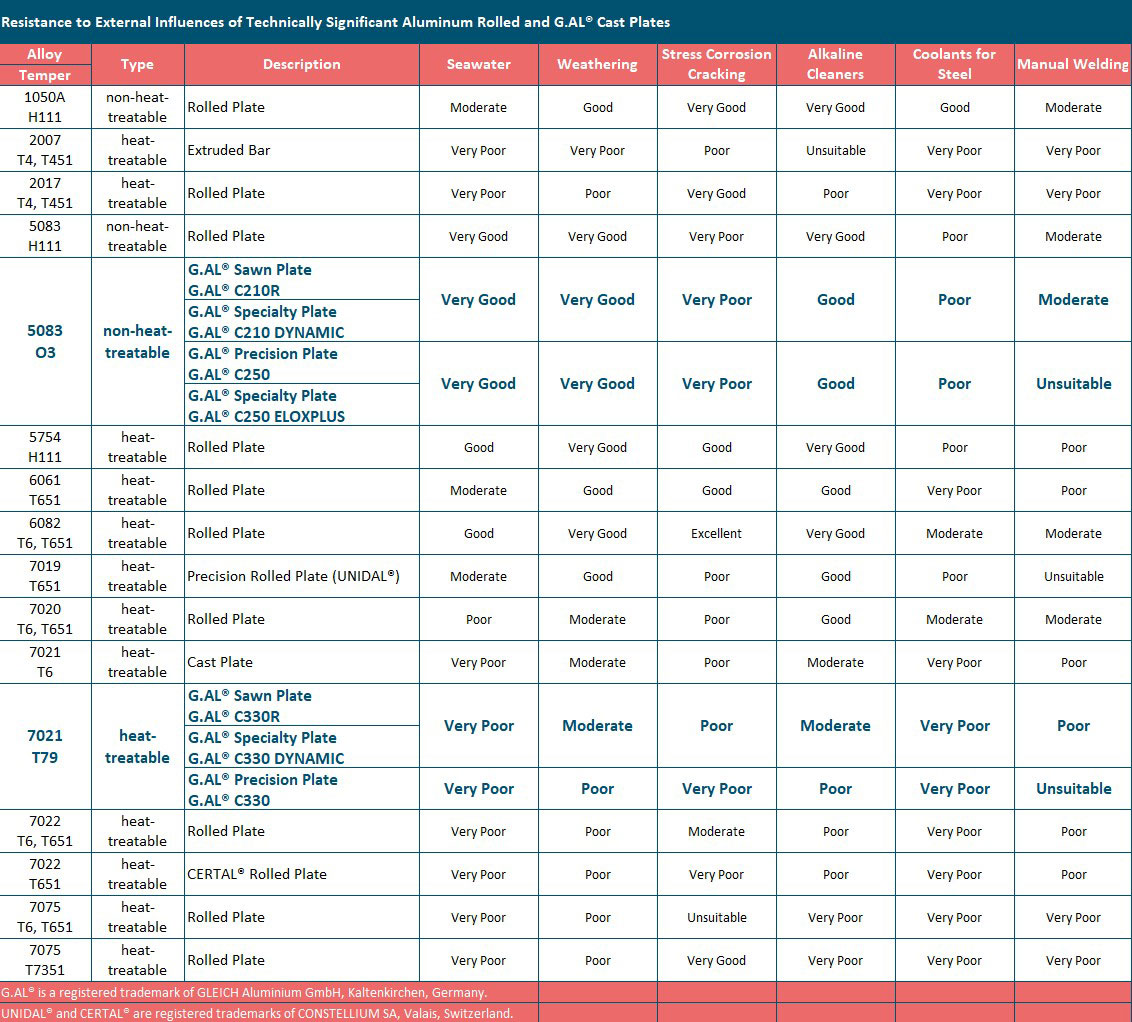
The topic of resistance to external influences is often underestimated, especially for high-value products used in medical technology or marine environments. The resistance properties of aluminum plates depend on their chemical composition and material temper.
Typically, resistance to seawater, weathering, and stress corrosion cracking (SCC) is evaluated. Table 4 provides ratings for these and other forms of corrosive attack.
Stress Corrosion Cracking (SCC)
While surface coatings and other protective measures can prevent most forms of corrosion, stress corrosion cracking (SCC) remains a unique challenge—especially in the automotive and aerospace industries where reliability is not negotiable.
Conditions for SCC Formation:
- Tensile Stress: This can arise from internal residual stresses within the component.
- Moisture: Even natural humidity is sufficient to initiate SCC.
When these two factors combine, hydrogen diffusion into the metal can occur, leading to hydrogen embrittlement. This causes the grain boundaries to crack suddenly, without warning.
Factors that Exacerbate SCC Susceptibility
Certain concentrations of alloying elements can increase the risk of hydrogen absorption in aluminum. Additionally, high-strength aluminum alloys are particularly vulnerable due to the distortion in their metal structure caused by aging processes. This distortion promotes grain boundary cracking under SCC conditions.
Recommended Alloys to Mitigate SCC Risk
If a component is at risk for SCC, we recommend use of the following alloys:
- High Silicon Content: e.g., EN AW 6082
- High Copper Content: e.g., EN AW 2017A
- Low Magnesium Content (<3%): e.g., EN AW 5754
- High Electrical Conductivity (>23 m/Ω·mm²): e.g., EN AW 2017A and EN AW 6082
- Overaged Tempers in the 7xxx Series: e.g., EN AW 7075 T7351 and EN AW 7050 T7451
Table 4
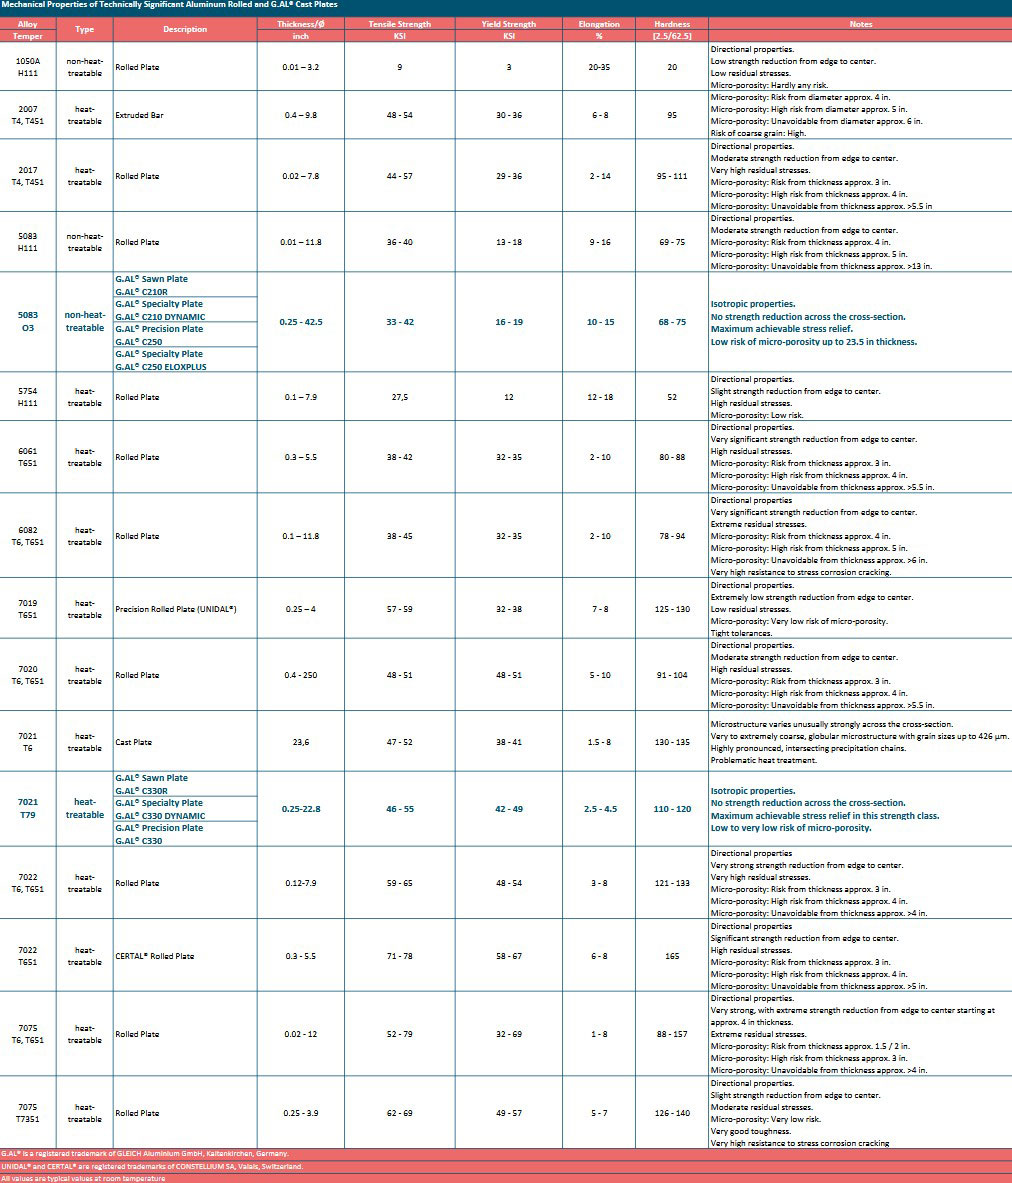
Mechanical Properties and Key Features
Table 5 outlines the mechanical properties and critical features of selected aluminum alloys. These properties, particularly the listed strength values, serve as essential benchmarks for material selection. The values are listed based on plate thickness.
Important Note on Tensile Strength and Material Selection
Tensile strength (Rm) is often regarded as the most significant criterion for selecting a material. Choosing based on tensile strength alone can lead to substantial issues in the installed condition and operation of the component.
Tensile strength indicates the point at which a material completely fractures.
What It Does Not Indicate: Tensile strength does not provide any information about when the material starts to fail structurally or permanently deform.
The more critical parameter for design is the yield strength (Rp0.2), equivalent to the yield point (Re0.2) in steel. Yield strength indicates the stress at which the material begins to deform permanently and is, therefore, the most important design parameter for material selection.
Table 5
Technological Properties
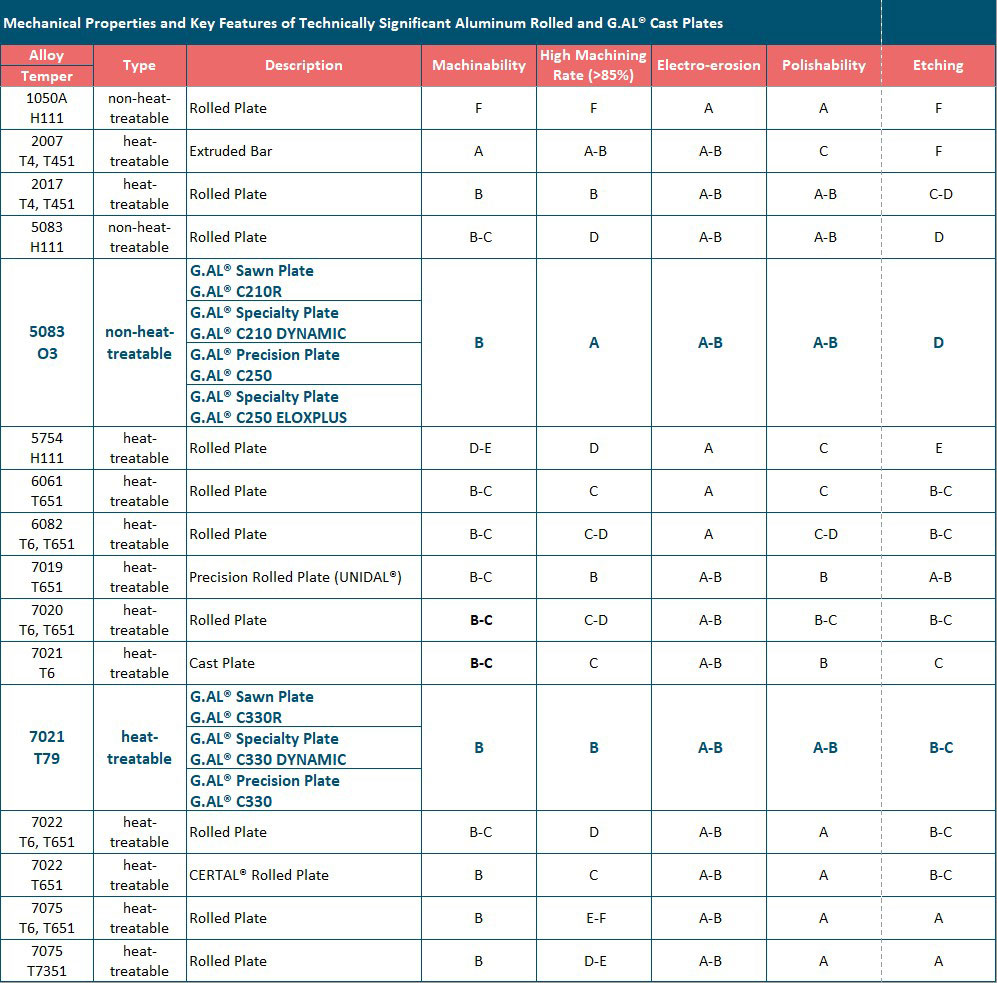
The technological properties of a material (as shown in Tables 6-x) are critical for cost-effective component production, especially when over 75% of the material is removed during machining. Proper consideration of these properties during material selection can decrease costs significantly.
In mass production, the right material choice can dramatically reduce waste rates, especially by minimizing component distortion during and after machining.
Key Areas for Assessment
The following properties must be evaluated:
1.Material Properties Based on the Manufacturing Process (Material Temper)
A. General Risk of Distortion
Primarily determined by the material’s homogeneity, and secondarily by its isotropy. Homogeneity is largely influenced by the parameters and technical capabilities of the heat treatment process (e.g., single-ingot furnaces vs. batch furnaces, temperature control).
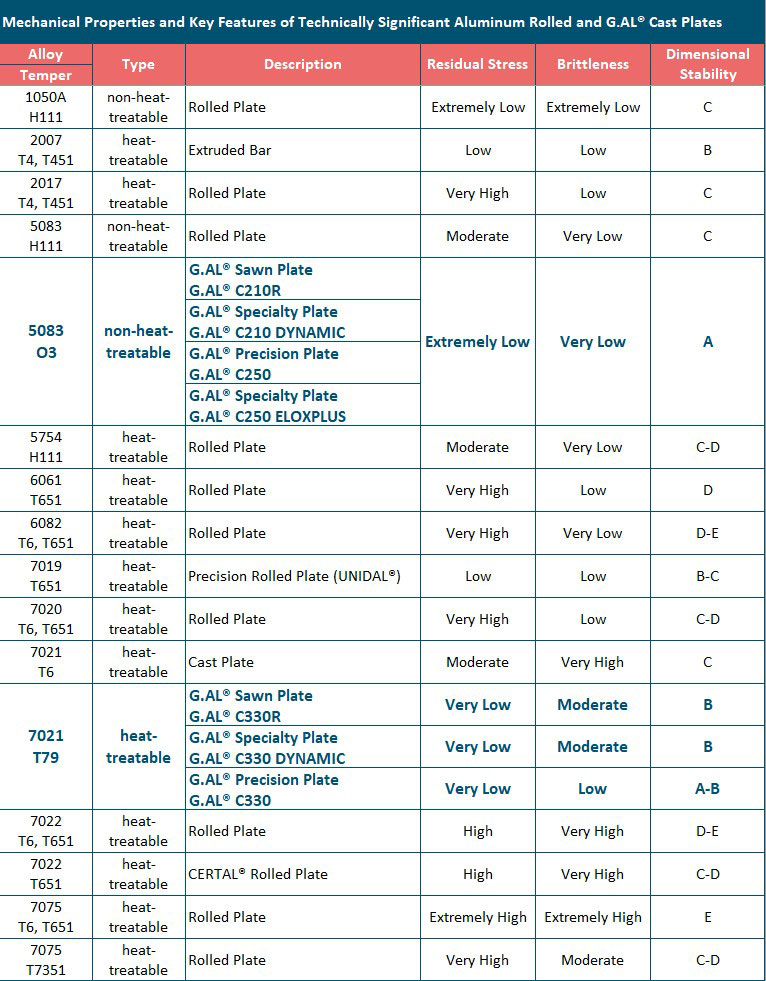
B. Dimensional Stability
Internal stresses introduced during the manufacturing process and their resulting impact on machining. This is particularly relevant for complex and heavily machined components.
C. Material Brittleness
Material temper (e.g., Txxx) also determines the hardness of the metal. The harder the metal, the more brittle it becomes. For instance, materials in T6 tempers are harder and more brittle than those in T7 tempers.
High brittleness increases the risk of hairline cracks, leading to leaks or component failure.
2. Material Properties Based on Alloy Type (Natural Hardening vs. Age-Hardening) and Physical Properties
Machinability
Includes factors such as achievable cutting speeds, chip formation, and tool wear. For example, EN AW 6061 and EN AW 6082 are downgraded due to their high silicon content, which causes increased tool wear.
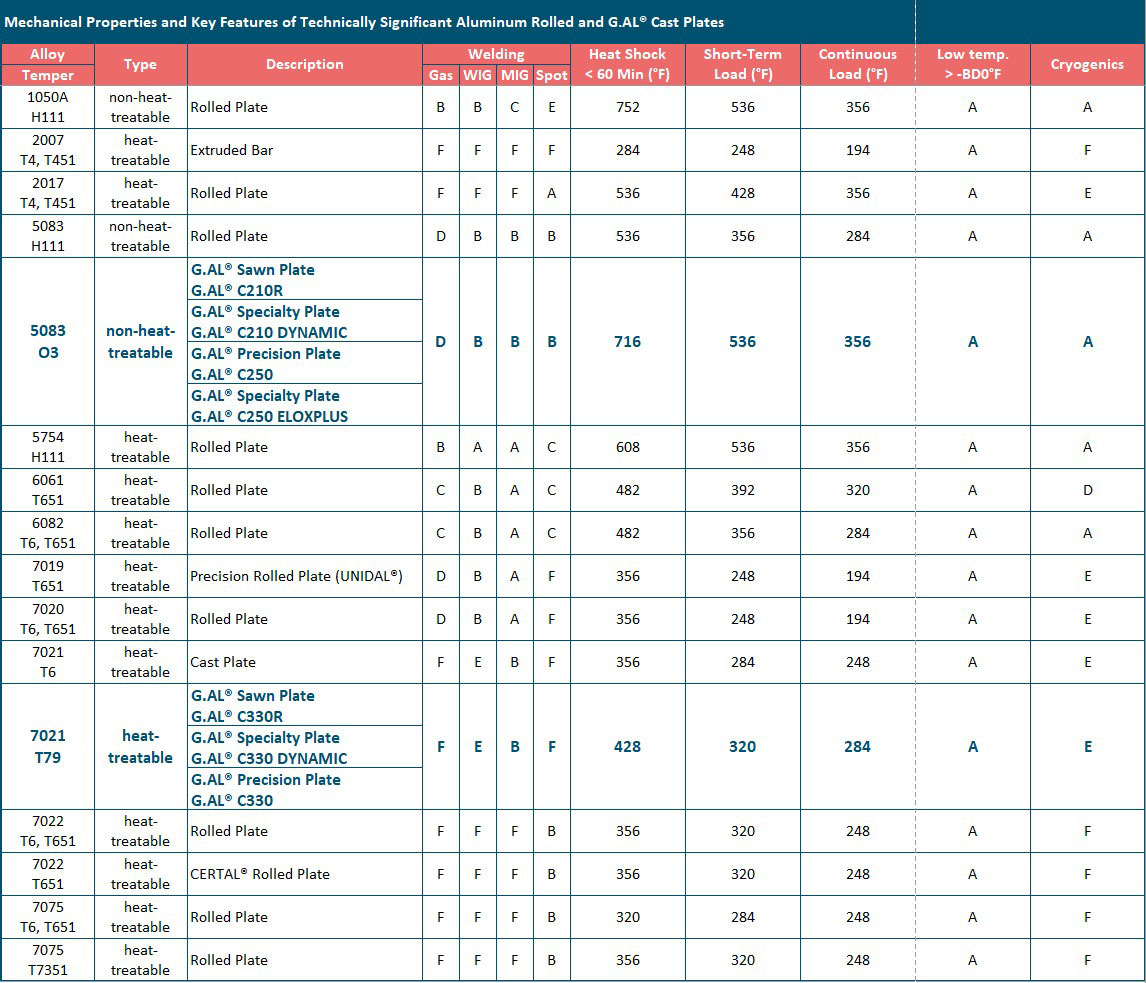
Weldability
- Defined by the material’s intrinsic weldability.
Example: High-strength EN AW 7075 sheets can be resistance spot-welded, but cannot withstand seam welding.
Welding often results in:
- Complete strength loss in the heat-affected zone (HAZ)
- Cracking along the weld seams shortly after use
Thermal behaviour
Avoid structural changes from heat exposure. Heat-treated alloys are particularly sensitive. Structural changes can cause irreversible strength and hardness losses.
Thermal Categories:
- Heat Shock: One-time thermal exposure, max 60 minutes
- Short-Term Load: Repeated thermal exposure up to 4–6 hours
- Long-Term Load: Continuous thermal influence, e.g., in mold making
*The values in Table 6-2 assume consistent heating/cooling rates of ~113–122°F (45–50°C).
Cryogenic Applications
Aluminum behaves differently than steel at low temperatures. It doesn’t become brittle, but instead it grows stronger as the temperature decreases. For cryogenics (below -238°F or -150°C), alloys are preferred with:
- Low thermal expansion
- Minimal zinc and copper content
- Lead-free compositions
- High corrosion resistance
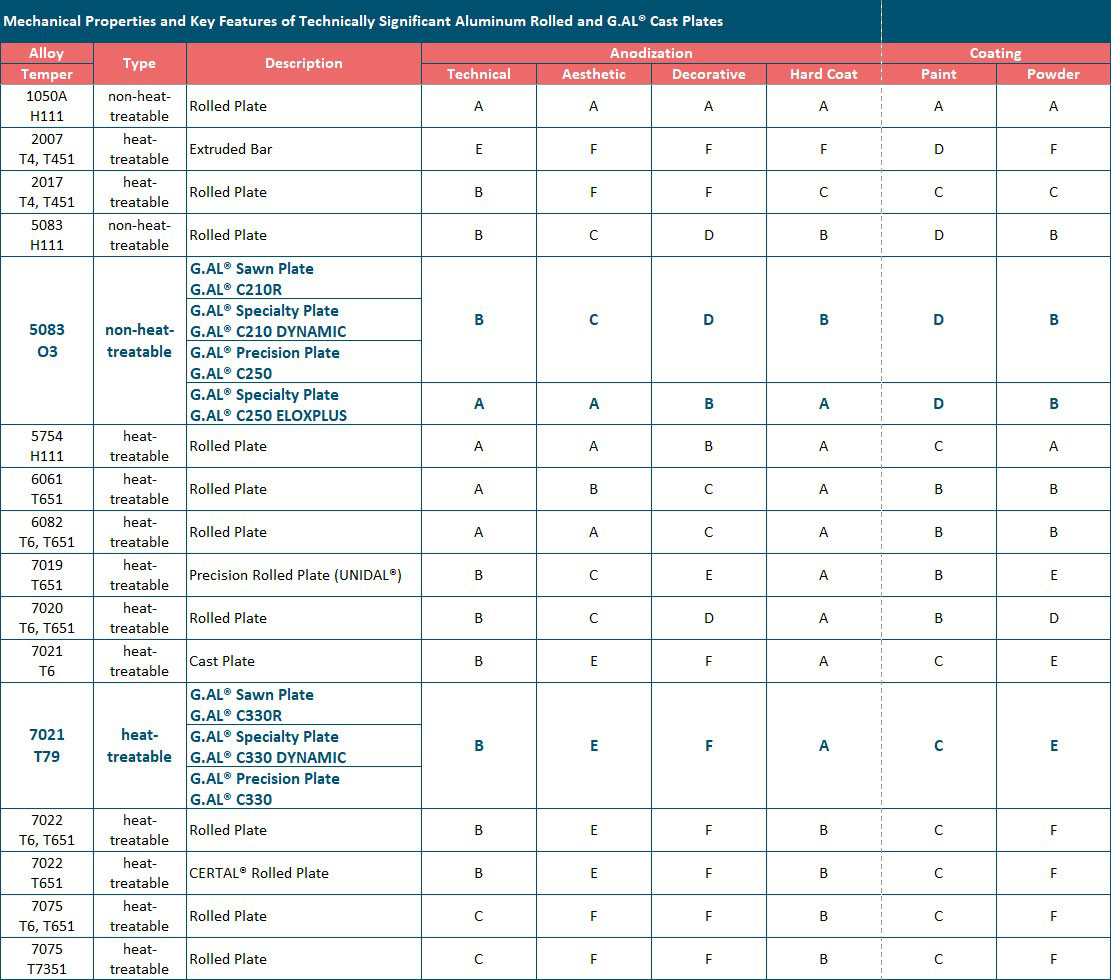
Anodizing Behavior
Focuses on traditional methods like anodizing and hard anodizing/hard coating. None of the listed alloys meet anodizing quality standards (DIN 17611). Even the best-rated alloys may exhibit variations in color and intensity between batches.
Coating
- Includes powder coatings (max bake temperature ~446°F or 230°C) and paint applications using spray guns.
Grading System for Technological Properties
These properties are largely based on empirical data collected across various industries and are represented on a scale similar to school grades:
A = Excellent: Outstanding suitability, minimal risk of defects, excellent results, negligible waste.
B = Good: Very suitable, low defect risk, good to excellent results, tolerable waste rates.
C = Average: Adequate suitability, some defect risk, acceptable results, tolerable waste rates.
D = Poor: Marginal suitability, high defect risk, poor results, high waste rates that require intervention.
E = Very Poor: Very high defect risk, poor to inadequate results, intolerable waste rates.
F = Unsuitable: Unsafe or negligent use, results often defective with critical errors.
*Additional terms related to G.AL® cast plates:
Mold Making Cast Plates/Sawn Plates
Refers to plates that are sawn on all sides or custom-cut to specific dimensions based on customer requirements.
Precision Cast Plates
Refers to mold making cast plates precision-milled on both sides to the tightest tolerances and protected with film
Protective Film
The protective film used by GLEICH is 80 µm thick, providing the highest level of protection against damage—even during machining processes.
More Topics
5083 vs 6061 Aluminum
Comparing Properties, Strength, and Applications. Whether your project demands dimensional stability or structural strength, both 5083 and 6061 offer unique features to support a smoother production process.
Aluminum in Medical Technology
Aluminum in Medical Technology GLEICH's Role in Advanced Healthcare Solutions Aluminum plays a...
Understanding Aluminum Tempers
When working with aluminum alloys—especially in tooling, mold making, or aerospace applications—knowing the alloy’s temper is just as important as knowing its composition.
